We have seen an increase in the use of video and it makes complete sense! Video is by far the best way to communicate anything about your personal or professional brand. Consumers are 5 times more likely to engage with video than any other content format and it’s easy to deduce why; video is rich media with audio-visual appeal which will always reign supreme. Video also builds brand loyalty because it allows viewers the opportunity to connect with who you are. Whether you are quirky, endearing, an introvert or a powerhouse, video allows you to put your unique personality on display. So the question is, how can I create better video on a budget?
I am no guru but over the years I have had to research and take recommendations to find equipment that served me based on what my objectives were. It’s always best to determine what you want to achieve before buying equipment because you can find yourself filling your online shopping cart with expensive things that you may not need or use. So, per the request of Instafam, I have outlined the equipment I use. The most expenive thing on my list cost me $60 USD. Keep in mind that some prices might have changed over a period of time. If you are a beginner or even intermediate, I hope this gets you started or helps to improve your video creation even in the slightest.
Camera
So let’s talk! When it comes to creating video a lot of persons think it’s all about the camera and to a certain extent, there is credence to that perception. But if you are just starting out and experimenting with no intention of being an Emmy-nominated videographer, or editing guru, you don’t have to buy an expensive DSLR camera such as Canon, Nikon or Sony brands. For me personally, I like to take things in stages, learn the basics, and then invest in the heavier equipment (if that is my next level). What I don’t want to do is invest too heavily in equipment that I may not use consistently or at all.
That being said, to create better video on a budget, any smartphone that shoots in 1080p will render crisp videos. I own an iPhone 10, as well as a Samsung 10+ and I go to my Samsung for all videos. In fact, videographers have sent me DMs asking what camera I use for my virtual conferences- it’s my Samsung! I use it for Youtube, IGTV and everything in between. In other words, most of us are already walking around and using smartphones that can do the job well.
There is also the issue of webcams. In light of the explosion of virtual meetings, conferences, and events, the need for crisp video is just as important. Quite a number of us are using our laptops and maybe some of you have this same problem; my built in camera resulted in a grainy look. To fix that, I got the $55 USD 2020 Autofocus 1080p Streaming Webcam. I plug it straight into my laptop via USB and voila, my video goes from zero to hero.
Support
My early videos were not necessarily shaky but rather angular because I often held my phone while recording. Often times, you will end up switching hands, moving back and forth, or creatively “kotching” your phone on something sturdy enough. But trust me, depending on the surface, your phone could very well, slide all the way down while you are recording and who on earth wants to risk that happening and ruining a great video? It was while I was in a supermarket that a young lady said that she enjoyed my videos but recommended that I invest in a tripod. I loved the feedback!
When creating better video on a budget, you have to consider the sturdy support of your phone or camera, so I invested in a $15 USD desktop tripod with wifi remote and Flexi-arms that allows it to wrap around different things. and small enough to hold on a table. Later on, I got a $30 USD 39.5″ Fotopro Phone Tripod Stand for the ability to adjust the height
Lighting
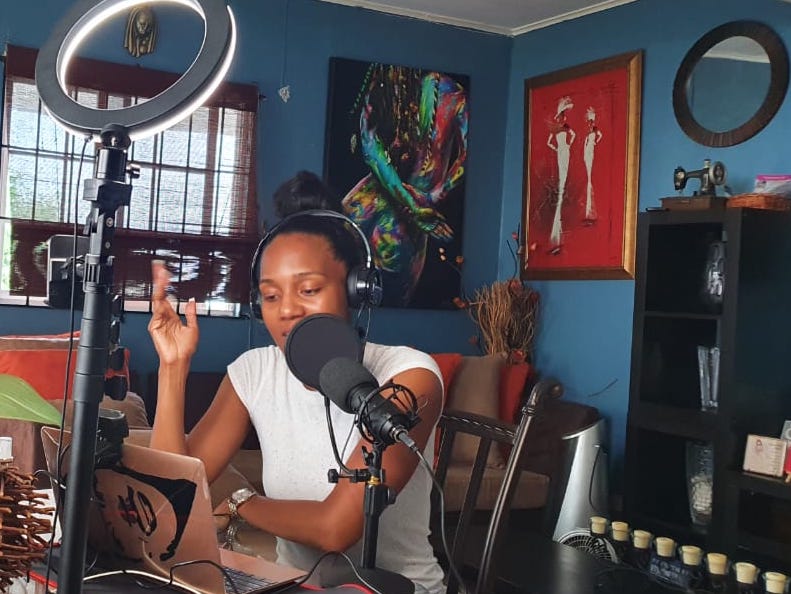
Boy oh boy when it comes to creating better video on a budget, lighting plays a key role. When I first started out, I never knew anything about natural light vs warm and white light. I just “point and shoot” LOL but then you look back at your videos and there are sharp shadows across your face that sometimes make it look as if you were in a bar fight OR there are shadows cast behind/beside you that detract from your presentation. In essence, I looked like one hot buttery mess LOL. There is an inclination to invest in the expensive softboxes (the parachute or umbrella-shaped lights that the professional photographers use) but if you aren’t at that stage yet, most of us use ring lights. They are smaller, more portable, and get the job done.
I started out with $23 USD Selfie Ring Light with Cellphone holder and Lazy Bracket which has a clip that allows you to affix it to various surfaces. My daughter has taken this one over completely. Then I graduated to the $37 USD 10″ Selfie Ring Light with an extendable tripod stand (this also comes with a cell phone holder and doubles as a selfie stick).
*** If you want an even larger ring light, I have seen the $85 USD Neewer 18″ Ring Light Kit recommended by lots of YouTubers. I can’t speak to it because I don’t own one personally.
It is important to make note that the tripod stands that come with the ring lights are mostly equipped to hold phones only. If you have intentions to use a camera, you will need to ensure that you use a tripod (similar to the ones I mentioned before in the Support section). Those are equipped to interchange between phones and cameras, they just don’t come with the ring light.
Audio
I know that there is a lot of emphasis on the visual aspect but honestly, you could have the best camera and best lighting but if your sound is terrible you can forget it! Now, in recent times we have seen a boom in the use of microphones by podcasters and YouTubers and yes, some of those mics carry very hefty prices, however, you don’t have to spend an arm and a leg on audio. Your objective is to create better video on a budget but your audio cannot have to sound crappy. Your mic choice will depend on the objective of your video and the type of content you produce.
I invested in a small Mpow USB Headset (All-Platform Edition) that gives me the ability to cancel noises around me via the headphones but also provides a mic at the end of the headset that you can control the volume. I also have a $40 USD Unidirectional Video microphone which amplifies my voice when I am doing video solo. That means it is unidirectional and cannot be used if you intend to have a conversation. This kit comes with mini mic, mini tripod, and wind muff (if you need to use outdoors). I just launched a podcast “Redirection with Terri-Karelle” so I had to graduate to a bigger mic that would permit conversation and crisp audio so I settled for a $60 USD USB Maono Microphone Kit. The sound quality during my virtual meeting and events improved exponentially.
One last thing, always shoot horizontally! I always forget because I am so accustomed to shooting in portrait/vertical mode for IG, but thought I should remind you, especially if you haven’t started yet. I wish you all the best.
Cheers
TK


Pingback: Lessons learnt from launching Redirection with Terri-Karelle Podcast - Terri-Karelle
Thanks for this article so very helpful I will be taking your advice.
This is everything! Very helpful Terri! I loved that you included the model and prices for the equipment too.👌🏽
Great info Terri! Thanks. Really love the recommendations and the fact that you have us the actual links. Much appreciated!
These are great tips! I actually added all items to my Amazon cart and I’m going to get them bit by bit. Thanks a lot and keep doing what you do ☺
Good stuff! Lots of good advice and actual products that we can check out and use. Thanks much for sharing. You could have kept it to yourself but you didn’t. Much appreciated!
These recommendations are super helpful as a new business owner. Video is a great way to clarify my brand message! Thankss!
So many great pearls here, I will definitely use them. Thank you, Terri
Pingback: Zoom Meetings Dos and Don'ts - Terri-Karelle
Thank you for such a detailed article. I will definitely be exploring some of your recommendations. Thank you Terri!